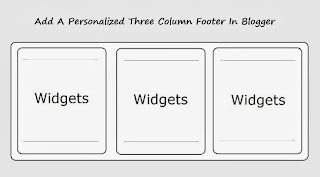
How to add customized three column footer in your blogger
Minggu, 06 Oktober 2013
0
komentar
After a long time i am here to talk a few tricks on the Blogging, the three column footer in blogger was used by so many pro bloggers, if you also want to do the same like them, you just need to add some codes in your blogger template and watch your three column footer in your blog in Live
The main advantages of three column footer blogger are
The main advantages of three column footer blogger are
- It gives more space to your blog
- you can use it for some extra widgets, important notifications
- Normally people use it for adding author box, labels, Alexa rank and DMCA Copyrights box
After the discussion on the benefits, we will move to the real test of how to add three column footer in your blog
1) Go to your Blogger blog and sign in with your account
2) After logged in go to the Templates
3) When you click on Templates, an separate box with both windows will appear at the left side of the templates
4) Click on " Edit Html" then go to the coding box
5) Expand all the widget codes, for the new interface it is little bit tricky
6) Scroll all over template, wherever an arrow mark points out click on all of it it will expand the template
7) Now press CTRL+F , it opens the Search box in the Coding window
8) Now search for this code " ]]></b:skin> "
9) Paste the given below code just above the " ]]></b:skin> " code
/* ----- customizedlower SECTION By http://way2usefulinfo.blogspot.com/----- */
#customizedlower {
margin:auto;
padding: 0px 0px 10px 0px;
width: 100%;
background:#066d87;
}
#customizedlower-wrapper {
margin:auto;
padding: 20px 0px 20px 0px;
width: 900px;
}
#customizedlowerbar-wrapper
border:1px solid #066d87;
background:#066d87;
float: left;
margin: 0px 5px auto;
padding-bottom: 20px;
width: 32%;
text-align: justify;
font-size:100%;
line-height: 1.6em;
word-wrap: break-word;
overflow: hidden;
}
.customizedlowerbar {margin: 0; padding: 0;}
.customizedlowerbar .widget {margin: 0; padding: 10px 20px 0px 20px;}
.customizedlowerbar h2 {
margin: 0px 0px 10px 0px;
padding: 3px 0px 3px 0px;
text-align: left;
color:#ff00f6;
text-transform:uppercase;
font: bold 14px Arial, Tahoma, Verdana;
border-bottom:3px solid #f6dc04;
}
.customizedlowerbar ul {
margin: 0px 0px 0px 0px;
padding: 0px 0px 0px 0px;
list-style-type: none;
}
.customizedlowerbar li {
margin: 0px 0px 2px 0px;
padding: 0px 0px 1px 0px;
border-bottom: 1px dotted #ccc;
}
10) Now search for the " </body> " and add the below code just above it
11) Now Save the template, if it is successfully done your template will not shows any errors, if you done any wrong coding, it will show so may errors
12) After successfully saving your template, go to your Blogger " Layout " , you can view " Add Widgets " in the Footer bar on your Blogger Template Layout
13) Now you can add your favorite widgets there
Customization of the above codes
For changing the widget width change the width 900px to your choice
For changing the Background color change the background: #066d87 to your choice
For changing the width of column, just change the 32%
I think you have understood all the above steps, if you have any difficulty adding this widget in your blog, just add your problems in the comments ,i will give you the solution
<div id='customizedlower'>
<div id='customizedlower-wrapper'>
<div id='customizedlowerbar-wrapper'>
<b:section class='customizedlowerbar' id='customizedlowerbar1' preferred='yes'>
</b:section>
</div>
<div id='customizedlowerbar-wrapper'>
<b:section class='customizedlowerbar' id='customizedlowerbar2' preferred='yes'>
</b:section>
</div>
<div id='customizedlowerbar-wrapper'>
<b:section class='customizedlowerbar' id='customizedlowerbar3' preferred='yes'>
</b:section>
</div>
<div style='clear: both;'/>
</div> </div>
11) Now Save the template, if it is successfully done your template will not shows any errors, if you done any wrong coding, it will show so may errors
12) After successfully saving your template, go to your Blogger " Layout " , you can view " Add Widgets " in the Footer bar on your Blogger Template Layout
13) Now you can add your favorite widgets there
Customization of the above codes
For changing the widget width change the width 900px to your choice
For changing the Background color change the background: #066d87 to your choice
For changing the width of column, just change the 32%
I think you have understood all the above steps, if you have any difficulty adding this widget in your blog, just add your problems in the comments ,i will give you the solution
TERIMA KASIH ATAS KUNJUNGAN SAUDARA
Judul: How to add customized three column footer in your blogger
Ditulis oleh Unknown
Rating Blog 5 dari 5
Semoga artikel ini bermanfaat bagi saudara. Jika ingin mengutip, baik itu sebagian atau keseluruhan dari isi artikel ini harap menyertakan link dofollow ke https://apk-x8.blogspot.com/2013/10/how-to-add-customized-three-column.html. Terima kasih sudah singgah membaca artikel ini.Ditulis oleh Unknown
Rating Blog 5 dari 5


0 komentar:
Posting Komentar